
The Transform panel
The Transform panel is where you move, turn and resize things on your avatar: the avatar’s own bones, the items you wear, and the pieces inside them. Every change applies as you go and saves itself, and everything you change can be put back with one press.
The panel speaks plain language. Bones have names like Head and Left hand, sizes are in Up/Down, Left/Right and Forward/Back, and turns are Tilt, Turn and Roll. You never need Unity for any of this.
Find your way around
Section titled “Find your way around”Open the Transform panel from the studio rail. The top of the panel is the selection header: the name of what you have selected, a chip that says what kind of thing it is (Bone, Object, SPS plug, SPS socket or Anchor), and, when the selection sits inside an item you wear, a Part of link that jumps to that item.
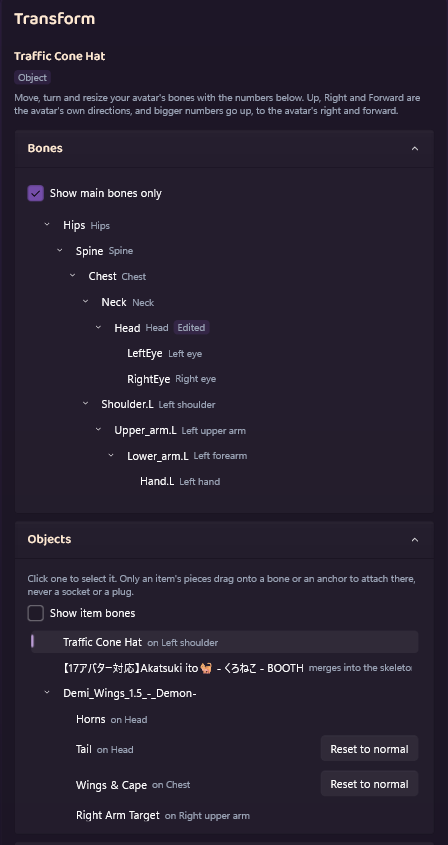
Below the header the panel is split into sections you can fold by clicking their titles. A folded section stays folded for that kind of selection until you open it again.
| Section | What is in it |
|---|---|
| Bones | Your avatar’s skeleton as a tree. Show main bones only is on by default and keeps it to the bones you would normally touch. |
| Objects | Everything on the avatar that is not a bone: the items you wear, their pieces, placed props, and every SPS socket and plug. |
| Position, rotation and size | The numbers for the selection, one group of three each, with a reset arrow on any group you have changed. |
| Attachment | How the selected item is attached to your avatar, and the Attached to picker when you can change that. |
| SPS plug and SPS sockets | The plug and socket settings. The SPS sockets and SPS plugs guides cover them. |
| Anchors | Spots you add to a bone so you can attach things there. |
| Surface tool | Shown while the Surface tool is on. It sets an object down on your avatar’s skin or clothes. |
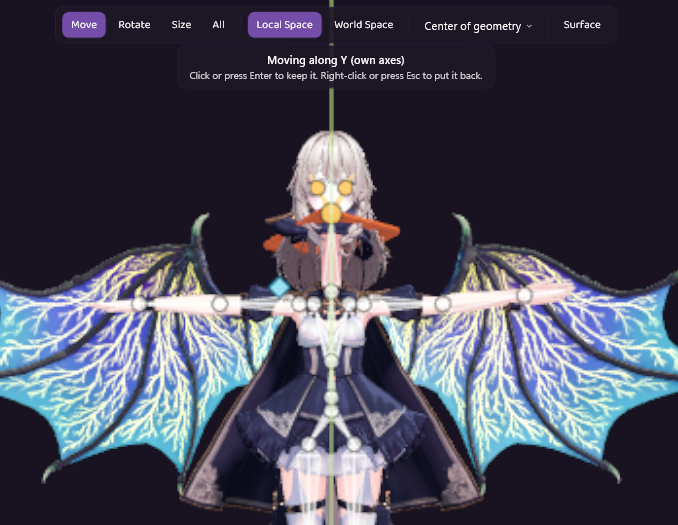
Above the picture sits a small toolbar: Move, Rotate, Size and All choose which handles the viewport shows, Local Space and World Space choose whether the numbers follow the bone’s own directions or the world’s, and the pivot menu chooses where the handles sit (Center of geometry keeps a hat’s handles on the hat even when its origin is on the floor).
Clicking things in the picture
Section titled “Clicking things in the picture”Click anything in the viewport to select it. A click selects whatever actually moves the thing you clicked. Click the body and you get the bone under your pointer. Click a hat and you get the hat. Click a pair of wings and you get the piece that carries them, because that is the piece whose numbers move the wings. Hover first and the thing that would be selected lights up, so you can see where a click will land before you make it.
Click empty picture, or press Esc, to select nothing.
Move a hat
Section titled “Move a hat”- Wear the hat from your wardrobe, then open Transform.
- Click the hat in the picture. The header names it, the chip reads Object, and its row in Objects highlights.
- Drag the handles in the picture, or type into Position and Rotation under the list. Up/Down lifts it, Tilt tips it forward or back.
- When it sits right, leave it. The change is already on the avatar and already saved.
Each group you changed gets a reset arrow. Press the arrow to put that one group back, or Reset to normal to put the whole hat back where it came from.
Two things make hats easier. The Surface tool on the toolbar lets you press on your avatar and set the hat down there, then drag to slide it along the head. And the camera dock under the viewport gets you close: pick the view nearest the hat, then drag from there.
Make the head bigger
Section titled “Make the head bigger”- In Bones, click Head, or click the avatar’s head in the picture.
- In Size, raise all three numbers by the same amount, for example from 1 to 1.2. Or pick Size on the toolbar and drag the center handle in the picture, which grows every side at once.
- Hair and anything else attached to the head grows with it, because they ride the bone. The Head row gets an Edited chip.
A bone’s Size always follows the bone’s own directions, even in World Space. The reset arrow next to Size puts it back to the way the creator made it.
Resize a hair’s ponytail
Section titled “Resize a hair’s ponytail”Many hair items carry their own bones, a ponytail chain or a pair of side tails, and those are not part of your avatar’s skeleton. The Objects section has a switch for them.
- Tick Show item bones at the top of Objects. This covers every item you wear at once, and it is a different thing from Show main bones only in Bones, which is about your avatar’s own rig.
- Each worn item’s own bones now appear under the item’s row, and the picture draws them as small squares you can click.
- Click the ponytail’s bone, either its row or its square, and change Size the way you would for a bone.
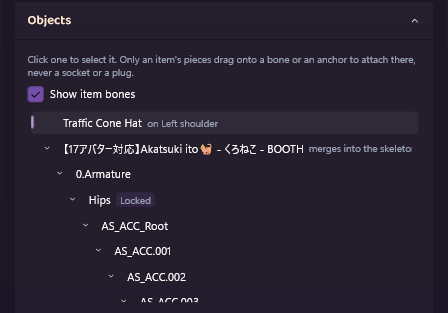
Some of an item’s bones are copies of your avatar’s own bones, put there so the item follows your body. Those show a Locked chip and cannot be edited here, and the Attachment section has a button that takes you to the avatar’s bone instead. A bone the item alone owns, such as a ponytail or a skirt chain, is fully editable.
An item whose skeleton merges into your avatar’s has an Objects row that says merges into the skeleton and no numbers, because moving the item as a whole changes nothing you can see. Move the avatar’s bones, or tick Show item bones and move the bones inside the item.
Attach something to a point you choose
Section titled “Attach something to a point you choose”Items attach to a bone. When you want an item somewhere a bone does not quite reach, put an anchor there and attach the item to the anchor.
- In Bones, select the bone the point should ride, such as Head.
- In Anchors, press Add anchor. A new row, Anchor 1, appears under the bone, already selected, and the picture marks it with a diamond. Give it a name in the Name box if you like.
- Move the anchor to your point with the handles or the Position numbers. Reset to normal puts it back at the bone.
- Select the item, and in Attachment set Attached to from Its own spot to your anchor. The list reads Anchor 1 (on Head) so you know which bone it rides.
You can also drag the item’s row in Objects onto the anchor’s row, or onto a bone’s row, to attach it there. Only an item’s pieces drag this way, never a socket or a plug. The same Attached to picker is in the Equipped panel next to the item.
Move the anchor and everything attached to it moves too. Delete anchor removes one nothing is attached to. If something is attached, the panel says so and offers to move it back to the bone first.
Keyboard transforms
Section titled “Keyboard transforms”If you know Blender, your fingers already know this. With something selected and your pointer over the picture:
| Key | What it does |
|---|---|
| G | Start moving it. Move your pointer and it follows. |
| R | Start rotating it. |
| S | Start resizing it. |
| X, Y, Z | Lock the change to one axis. Press the same letter again to switch between the bone’s own axis and the world’s, a third time to unlock. Hold Shift with the letter to lock to the plane across that axis instead. |
| 0 to 9, -, . | Type an exact amount. Backspace takes a digit back. |
| Click or Enter | Keep the change. |
| Right-click or Esc | Put it back the way it was. |
| T | Show every handle at once (the toolbar’s All). |
While a keyboard transform is running, a line under the toolbar reads what is happening, for example Moving along Y (own axes) or Rotating: 15, and the toolbar shows the mode.
Put everything back
Section titled “Put everything back”Every change in this panel can be undone at three sizes:
- The reset arrow next to a group puts that one group of numbers back.
- Reset to normal under the groups puts the selected bone or object back entirely.
- Reset everything at the bottom of the panel puts every bone and object you changed back to the way their creators made them. It asks first, tells you how many parts it will reset, and cannot be undone.
Anchors are not changes to a bone, so Reset everything leaves them where they are. The history list on the studio bar also carries each transform edit, so Undo takes the last one back.
When Unity is not running
Section titled “When Unity is not running”The panel works on your avatar’s project, and that project opens in the background when you open the avatar. If it closes unexpectedly, your changes are kept and the panel says so: Changes saved. They will apply automatically the next time this avatar’s project is open. The Go Live rail waits for them before an upload, and Try it applies them first.